New features in the latest (2.0.37) release
- WoWonder v.4.1.1 and PlayTube 2.2.1 integrations;
- Minor UI fixes;
Integrations are included in extension folder of the latest release.
Features in previous releases
- Virtual background, where you can blur your background or add your own. When the meeting starts click on the virtual icon and choose to blur your background or set a fancy image for a background.
- Active meetings. The organizers can track if there are any active meetings running and they also can join them.
- Text to speech module. Now your chat and translated messages can be received as voice to the other party. There are two new configuration options – transcribe.text_speech_chat and transcribe.text_speech_transcribe that enables text to speech in chat and translation modules;
- Feature requests: API secured with Authorization token, option for scheduled meetings to end for organizer too and password recovery module;
- New Chrome extension to assist your organizers. More information about this feature can be found here.
- Integration with WoWonder 3.2.2, PlayTube 2.1 and WonderTag 2.3.6 theme. Demo with admin1/admin1234 and demo1/demo1234 users is available here.
- Integration with DocTreat theme;
- Integration with LatePoint Plugin. You can read more about LiveSmart integrations here;
- Video Session logs gathering of all video related events – start video, end video, attendee joining and leaving, start and stop screenshare, start and stop recording. There is a new configuration option – serverSide.videoLogs and additional SQL file to be executed;
- Feature request – timer for remaining time for scheduled meetings, introduced a new configuration property – videoScreen.meetingTimer;
- Social media login. Enabled for Facebook and Google accounts.
- Admission facility. Now host can approve or reject an attendee in a meeting. This is a configuration option;
Installation Manual
LiveSmart can be legally purchased only from CodeCanyon. If you have obtained the software from another source, you face the risk of it not working properly, or to have inclusions that may harm your system.
Installation of LiveSmart is easy and straightforward as there is an installation page and script to help you with the process. There is a video tutorial on how to do this. You need some basic knowledge on how to connect to your server over terminal and root access, as you need to do some Node.js installations.
1. You need Node.js installed on your server, at least version 10.* and valid SSL certificates;
2. For flawless video sessions you also need to install your own TURN server as described in this Ubuntu tutorial or here: CentOS tutorial. Other option is to use free or commercial one.
For detailed step by step instructions and video manual, please enter your purchase code in the field or contact me at contact@livesmart.video:
STUN/TURN Servers
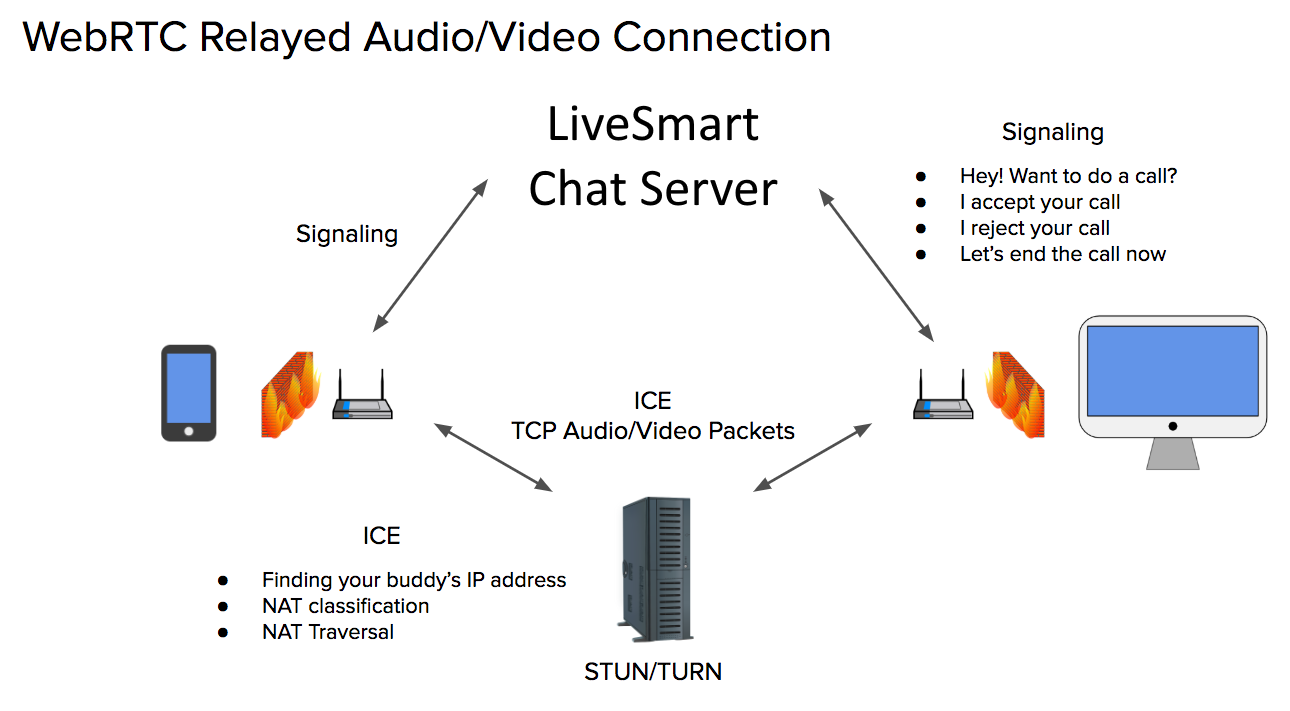
SmartVideo Video platform offers all customers an advanced video real-time communications solution through all audio/video/screen/data streams are transmitted. Generally, it has to be deployed over a public Internet so any user must connect and send media fragments over RTP (Real-time Transport Protocol) ports without specific network issues.
However, sometimes this is not enough. Some users try to connect through different IP networks where Firewalls and NATs (Network Address Translators) could include specific policies that do not allow any kind of RTC communications. ICE (Interactive Connectivity Establishment) protocol is used to find the best connection solution. It defines a systematic way of finding possible communication options between a peer and the Video Gateway (WebRTC).
What is a STUN Server?
Sometimes, you can use a protocol called STUN (Session Traversal Utilities for NAT) that allows clients to discover their public IP address and the type of NAT they are behind. This information is used to establish the media connection. In most cases, a STUN server is only used during the connection setup and once that session has been established, media will flow directly between the peer and the Video Gateway (WebRTC).
What is a TURN Server?
However, even if we setup properly a STUN server, there are very restrictive corporate networks (e.g: UDP traffic forbidden, only 443 TCP allowed…), which will require clients to use a TURN (Traversal Using Relays around NAT) server to relay traffic if direct (peer to Video Gateway) connection fails. In these cases, you can install our TURN server (in another instance) to solve these issues.
The TURN server is really easy to add for all your RTC developments, including it as another ICE server within the Video Gateway (WebRTC).
The following diagram depicts the signaling process:
Server Side User Login
You may use server side scripts to enable login for your visitors. The /server folder contains two PHP files and a sample SQL dump for users table.
connect.php contains necessary information for DB connection and the script.php is performing the connection logic. The sample users table contains only two fields – username and MD5 encrypted password, but it can be enhanced to adapt for your own system.
Front End Installation and Guide
The front-end file structure is as follows:
– agent.html and agent.php – sample pages showing actual visitors. It can be set behind user/pass and shows the visitors of your site;
– client.html and client.php – sample pages containing the status button, from where your visitors can start video/chat communications with you;
– pages – HTML pages;
– pages/r.html – this is the actual video/chat panel, where the video objects resides;
– config/config.json – configuration JS file;
– js/bundle.js – bundled JavaScript code, responsible for loading the core JS files.
– js/bundle-client.js – bundled JavaScript that is included in the video popup window.
– css/ – CSS files. button_*.css – all the button styles.
– extensions/ – integrations with WoWonder, Wondertag, Doctreat, PlayTube and Latepoint platforms. Google Chrome extension to assist LiveSmart organizers.
– locales/ – internationalization JSON file.
– media/ – ringtones.
– server/ – server side PHP scripts and SQL dump file. Used for server side user login and saving the recorded video file.
– ws/ – composer and package JSON files for signaling server.
– ws/ssl/ – sample self-signed certificates.
– admin/ – admin panel to be integrated in bigger platforms.
– dash/ – dashboard standalone admin panel for managing rooms/users/organizers/recordings/configuration settings and locales.
Status Button
Add the following code snippet to your site, so you are able to track and communicate with your visitors:
<div id="nd-widget-container" class="nd-widget-container"></div>
<script id="newdev-embed-script" data-message="Start Video Chat" data-source_path="YOUR_DOMAIN" src="YOUR_DOMAIN/js/widget.js" async></script>
The script accepts some data attributes, so you can personalize it:
| Data attribute | Description |
|---|---|
| data-source_path (*) | The website your button resides. It should be HTTPS |
| data-button-css | Optional. The CSS of the button itself. The default style is located at /css/button.css. There are six prefefined styles that are listed below |
| data-message | Optional. The label on the button. Default is “Start Video Chat” |
| data-avatar | Optional. Image of the organizer. It can be PNG, JPG, CSV. This can be also defined in the config.json file. |
| data-names | Optional. Names of the organizer. This option can be also defined in the config.json file |
| data-room_id | Optional. If you need the button to open only specific room. |
| data-agent_id | Optional. Defining specific organizer scope that only organizer with the same ID in the organizer dashboard will be notified of client presence. |
| data-config | Optional. Define a config file for the meeting. It needs to be present in /config folder of LiveSmart. Otherwise it will fallback to the default configurations; |
| data-iframe_id | Optional. ID of target iframe. If you want the video window to open in an iframe and not in popup. Make sure the “allow” attribute with values “camera, microphone” is included; |
| data-intab | Optional. If this is set to true, the video window will open in a new tab, not in popup window. |
| data-offline_email | Optional. Contact email when you are not available and the button is offline. By clicking on the button a contact form will open and the visitor can add his inquiry there. |
| data-offline_page | Optional. URL of the contact page. If set, when the visitor clicks on the offline button, he will be redirected to the specified contact page. |
| data-visitor_name | Optional. Visitor name can be set with this parameter. Used when the button is for a specific predefined user. |
| data-datetime | Optional. Datetime added in the format YYYY-MM-DDThh:mm:00.000Z in UTC. |
| data-duration | Optional. Duration of the meeting in minutes. |
| data-disablevideo | Optional. Option to disable video for the meeting. |
| data-disableaudio | Optional. Option to disable audio for the meeting. |
| data-disablewhiteboard | Optional. Option to disable whiteboard for the meeting. |
| data-disablescreenshare | Optional. Option to disable screenshare for the meeting. |
| data-transfer | Optional. Option to disable file transfer for the meeting. |
| * | Mandatory data attribute |
Config file properties:
– terms – string, this is URL for the Terms&Conditions. If filled, the checkbox will appear in the entry form and will be mandatory;
– text_speech_chat – true/false. Enables text to speech in chat, default is false;
– text_speech_transcribe – true/false. Enables text to speech in translation module, default is false;
| Property | Description |
|---|---|
| agentName | Optional. Name of the agent/owner. This can be set also in the code snippet of the button. |
| agentAvatar | Optional. Avatar, image of the agent/owner. This can be set also in the code snippet of the button. |
| chromePluginId (*) | Id of the Chrome screen sharing plugin. Do not change unless you have own plugin installed. |
| smartVideoLanguage (*) | Language of the application. If you need it translated, you have to set locale file with the same structure in the /locales folder. If you set smartVideoLanguage: es_ES you must have es_ES.json file with the same structure as en_US.json . |
| anonVisitor (*) | How the anonymous visitor will be seen on your end. If you set Visitor in the chat pane, or in the video preview, you will see the attendee name as Visitor-[some number]. |
| entryForm | Optional. It has additional sub parameters: – enabled – true/false, default is false; – required – true/false, the form is mandatory. Default is false; – private – true/false, set the form to have password field. If the admin has set a pass for this room, the pass field is mandatory. Default is false; – showEmail – true/false, show or not email field. Default is false; – showAvatar – true/false, show or not field for inputing avatar URL. Default is false; |
| videoScreen (*) | Defining the video screen UI – chat – true/false, show or not chat pane in the right of video session, whiteboard or broadcast. Default is false; – greenRoom – true/false, enables pre-call form, where user can choose available audio and video devices. Default is false; – waitingRoom – true/false, system messages are shown in the video panel, not in the chat. Default is false; – onlyAgentButtons – true/false, only organizer side has action buttons activated. Not visible for visitors. Default is false; – enableLogs – true/false, if set to true, this will enable logging in the browser console. It is recommended to be false and enabled only for tracking problems. Default is false; – videoConstraint – JSON ({“width”: {“min”: 640, “ideal”: 640, “max”: 640}, “height”: {“min”: 400, “ideal”: 400, “max”: 400}, “frameRate”: { “max”: 30 }, “aspectRatio”: {“ideal”: 1.7777777778}}), set video quality. Optional, may not present; – audioConstraint – JSON ({“sampleSize”: 16, “channelCount”: 2}), set audio quality. Optional, may not present; – screenConstraint – JSON ({“maxWidth”: 1920, “maxHeight”: 1080}), set screenshare max width/height quality. Optional, may not present; – videoContainerStyle – this is a required attribute and is defining the UI of the LiveSmart pane. The default value is ‘conference’ and is representing a Zoom like UI. If you set ‘simple’, LiveSmart will use the old look and feel; – separateScreenShare – true/false. When starting a screen share, its stream is replacing video. By setting this setting to true, the screen sharing will be in a separate stream and will not affect showing the video. Default is false; – broadcastAttendeeVideo – true/false. When an attendee in the broadcasting session raises a hand, the organizer can grant him permission to speak. He can join with audio if this setting is false and with audio and video if true. Default is false; – allowOtherSee – true/false. When an attendee in the broadcasting session is granted privilege to broadcast and if this option is enabled, the attendee will be seen/heard by everybody. Default is false; – localFeedMirrored – true/false. If is true, the local video screen is showing as mirrored. Default is false; – exitMeeting – String/false. This property is defining the behavior on exit meeting. It can be an URL or JavaScript. Example: https://google.com will redirect to Google on exit. javascript:alert(‘Your meeting has ended’) will popup an alert with sign “Your meeting has ended”. Default is false; – exitMeetingOnTime – true/false. If set to true, when there is a duration set of the meeting, it will pop a notification one minute before the meeting ends and when the meeting finished it will automatically ends it. Default is false; – meetingTimer – true/false. Applies only to scheduled meetings. If set to true, the timer will appear two minutes before the meeting ends. Default is false; – admit – true/false. Enables admission facility. If set to true, visitor is required to be approved by the host to enter the meeting. Default is false; – pipEnabled – true/false. Enables picture in picture feature. Supported by Chrome for desktop, both desktop and iOS Safari and Edge. It is enabled by default for Firefox. Default is false; – videoFileStream – String. Set here a path to video file (supported formats are mp4, webm, mov, ogg); – primaryCamera – ‘user’/’environment’. Defines the default starting camera for mobiles. ‘User’ is the front camera, ‘environment’ is the back one. Default or if missing is ‘user’; – dateFormat – possibility to add different time formats for Scheduled meetings. ISO, short, medium and long date formats are supported; – videoConference – true/false, when the videoContainerStyle is set to ‘conference’ and this attribute is true, the video screen of the talking attendee will become big. Default is true; Constraints values can be seen described in this article. |
| serverSide | Optional. Enabling server side login check with PHP and MySQL scripting. For now has only one sub parameter: – loginForm – true/false, enables server side user login. Check PHP scripts and SQL dump file in /server folder. Default is false; – chatHistory – true/false, enables saving of chat history. Check PHP connect and script PHP files and SQL dump in /server folder. Default is false; – agentInfo – true/false, gets organizer info from the DB, ignoring all the other information – the URL or the button. Default is false; – token – true/false, organizer and user login type. Tokens are defined for each attendee per room. Default is false; – feedback – true/false, enables feedback facility. Rate and feedback form triggers for visitors once the call is ended. Default is false; – checkRoom – true/false, If set to true, video is allowed only for enabled rooms from the Database, listed in Room list. Default is false; – videoLogs – true/false, If set to true, the system will start to gather all video related events – start video, end video, attendee joining and leaving, start and stop screenshare, start and stop recording. Default is false; |
| whiteboard | Configuration settings for whiteboard feature: – enabled – true/false. Default is false; – allowAnonymous – true/false. If true, all the attendees in the conference can draw. Default is false; |
| transcribe | Configuration settings for voice to text feature: – enabled – true/false. Default is false; – language. The language to which voice will be transcribed into text. Available languages are listed here. Default is “en”; – languageTo. If set, this will be the language to which will be translated the specified in language;– apiKey. Google API key necessary for the translation to work. In this tutorial is described how to get it.; – direction. This parameter can have three values – both, agent or visitor. When used both, the translation goes in the two directions – from organizer to visitor and vice versa. When set to agent, the organizer speech will be translated from transcribe.language to transcribe.languageTo in the visitor screen. If direction is visitor, then the visitor speech will be translated from transcribe.languageTo to transcribe.language in the organizer screen; |
| recording | Optional. It has additional sub parameters: – enabled – true/false, default is false; – download – true/false, if set to true, right after the recording or meeting ends, the record file will be downloaded. Otherwise a link for preview will be shown. Default is false; – saveServer – true/false, if set to true, the recorded file will be send to backend for saving. Check /server/saverecord.php. Default is false;– autoStart – true/false, if set to true, the recorded will start automatically the moment call is established. Default is false; – screen – true/false, if set to true, enables recording of everything. Records are in chunk of one minute long. Default is false; – oneWay – true/false, if set to true, enables recording only for visitors. Organizer is not recorded. Default is false; – transcode – true/false, if set to true, enables FFmpeg transcoding of the recorded file. It is mandatory FFmpeg to be installed on your system (Ubuntu, CentOS, Debian and Windows) and recroding.saveServer to be true. Default is false; – filename – “record_%room%_%datetime%”, defining the file name pattern. %room% and %datetime% are placeholders and will automatically be changed with the room name and the current date/time. – recordingConstraints – defining the desired recording video size. Default values are {“width”: 360, “height”: 240}. |
| appWss (*) | URL of the signaling server. It should be SSL enabled – WSS. |
| maxParticipantsAllowed | Optional setting, limiting participants in a meeting. |
| blackList | Optional setting, list with rooms, that are banned. Format is [roomId1, roomId2, …] |
| alwaysNotify | Optional setting, if set to true, notification will be always set, not only when the screen is not on focus. Default is false. |
| maxParticipantsAllowed | Optional setting, if set, will define number of allowed visitors in a meeting. |
| social | – enabled – true/false, default is false. Enables social media login. entryForm.enabled also should be true, and Facebook and/or Google API IDs be provided; – facebookId. Facebook application ID, necessary for Facebook login. Check this tutorial on how to get ID; – googleId. Google API ID. Check the tutorial on how to get Google client ID. |
| iceServers (*) | – requirePass – true/false, default is false. For more info on how to encrypt username/password, check in the installation manual; – STUN/TURN servers. Defaults are to Google STUN. If you have enabled own STUN/TURN server, you need to set it here. |
| * | Mandatory fields |
Predefined button styling
| CSS File | Button |
|---|---|
| button_green.css |  |
| button_blue.css |  |
| button_gray.css |  |
| button_lightgray.css |  |
| button_lightred.css |  |
| button_orange.css |  |
Video and Chat Page
After the organizer is in the room, it is now opened for video and chat:
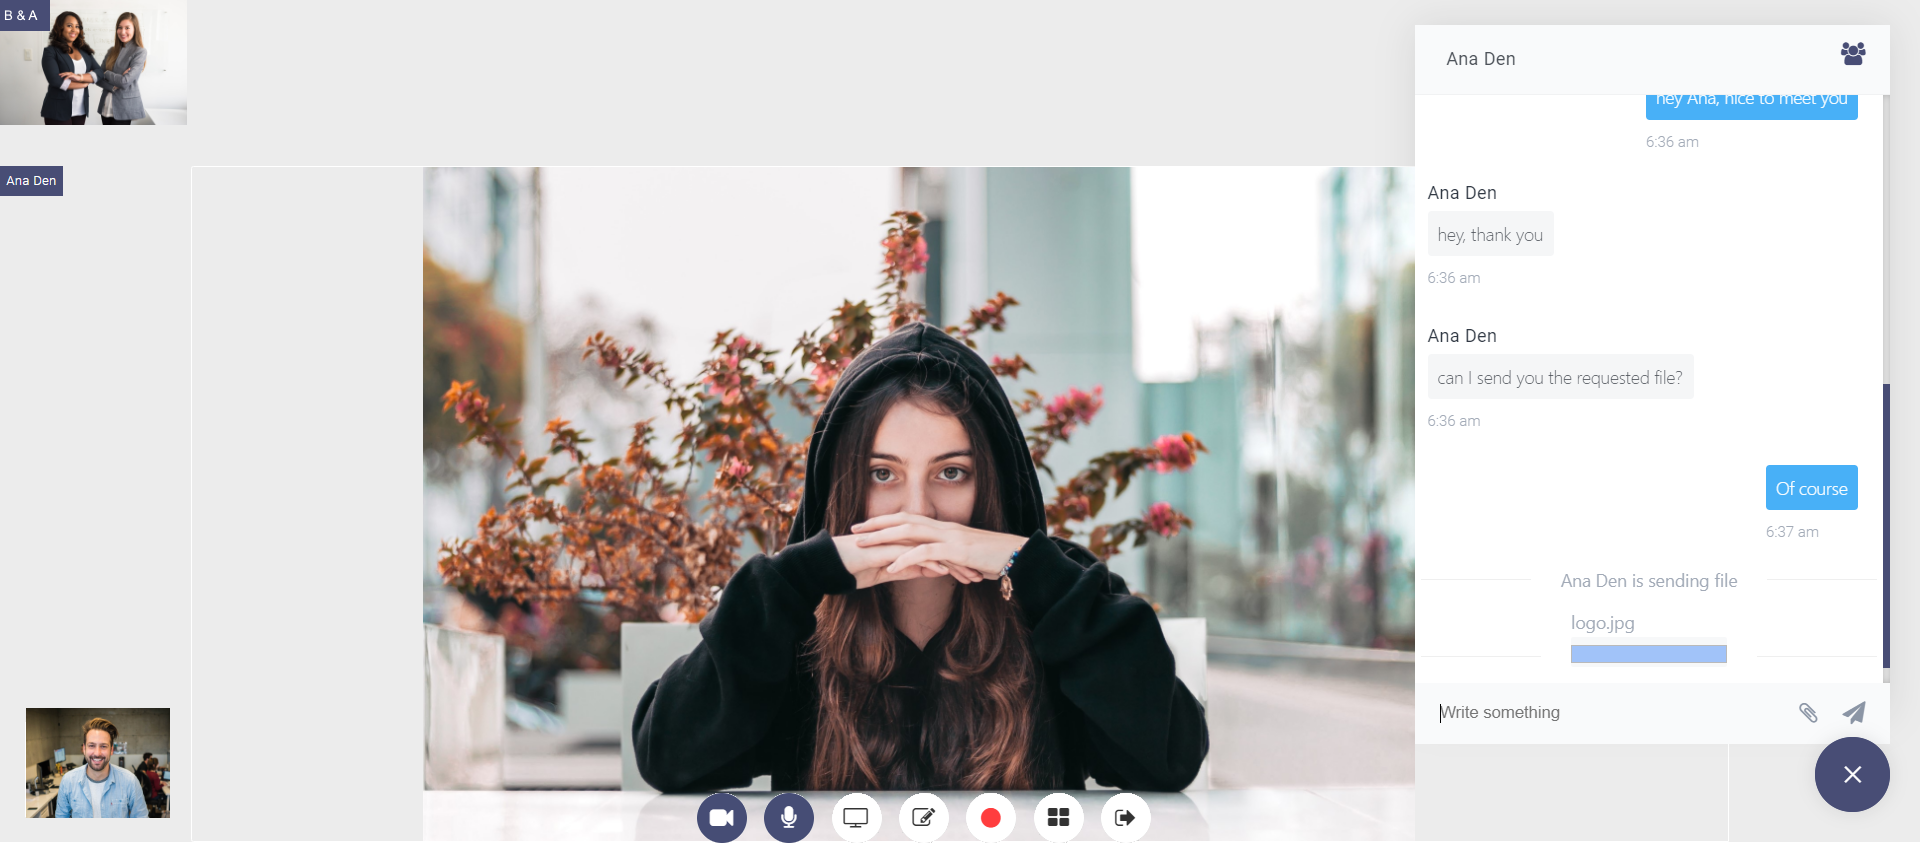
From here users can toggle video and audio, do screenshare and whiteboard, make a snapshot, or start a recording session.
Remember to give permission for the browser to user your camera and/or microphone.
The available buttons here are:
– Toggle video – start/stop video camera;
– Toggle audio;
– Share screen – available only for Chrome, Firefox and Edge;
– Switch camera – if on mobile with back and front cameras, or on computer with more than one camera installed;
– Share screen – available only for Chrome, Firefox and Edge;
– Whiteboard – available only for Chrome, Firefox and Edge;
– Snapshot – take a screen capture of the video.
– Recording – Start/stop a recording of a meeting. Available only for Chrome and Firefox;
– Exit – user can exit from the current meeting.

Internationalization
LiveSmart Video Chat supports internationalization. The locale strings are in locale JSON file in /locales folder. If you need to translate to Spanish, you have to add es_ES.json file to /locales folder with the same structure as en_US.json file and set language in the /config/config.json smartVideoLanguage: es_ES
The key->value pairs should be as follows
{

...

"Cancel" : "Sesion finalizada.",

"waitingToConnect" : "Conectándose",

"callWithVideo" : "Llama a través del servicio de video llamada.",

"callWithAudio" : "Comunícate a través del servicio de llamada.",

...

}
You can skip these manual steps, by using the locale section in the Dashboard panel.
Screen Sharing
Screen sharing is available for Chrome 72+, Firefox 52+ and MS Edge 17+ browsers without additional installations. If you use an older Chrome browser, we have a multi domain ScreenShare plugin specially done for LiveSmart Video Chat.
Also the /extension/chrome folder contains JS code for enabling screen sharing on Chrome browser. Screen sharing on Firefox and Edge is pluginless.
In order to enable screen sharing plugin for older Chrome browsers you have the following options:
– download the plugin from Google Webstore or if it is not installed and you click on the Share button, you will be redirected to it.
– change the chromePluginId in /config/config.json and icon.png in /extension/chrome. Then zip the files and publish the extension to Google Developer Dashboard;
– publish the extension locally. Open chrome://extensions in your Chrome, check Developer mode in the upper right corner, click on Load unpacked and point to where is you chrome extension folder.
Private Access
If you need to make access to your rooms private behind a password, you can do it two ways:
– from the admin or dash panels. Set entryForm.enabled to true, and generate the room with a password from the organizer page;
– Make this server side. Set entryForm.enabled, entryForm.showEmail, entryForm.private and serverSide.loginForm to true, check if PHP connection script is properly set and execute SQL dump files in /server folder. The PHP file connect.php is used to make the connection to the DB and script.php is doing the actual job. We assume that the table is lsv_users as is in the SQL dump file, but you can use your own backend facility. Make sure you have added users in the table from the admin panels;
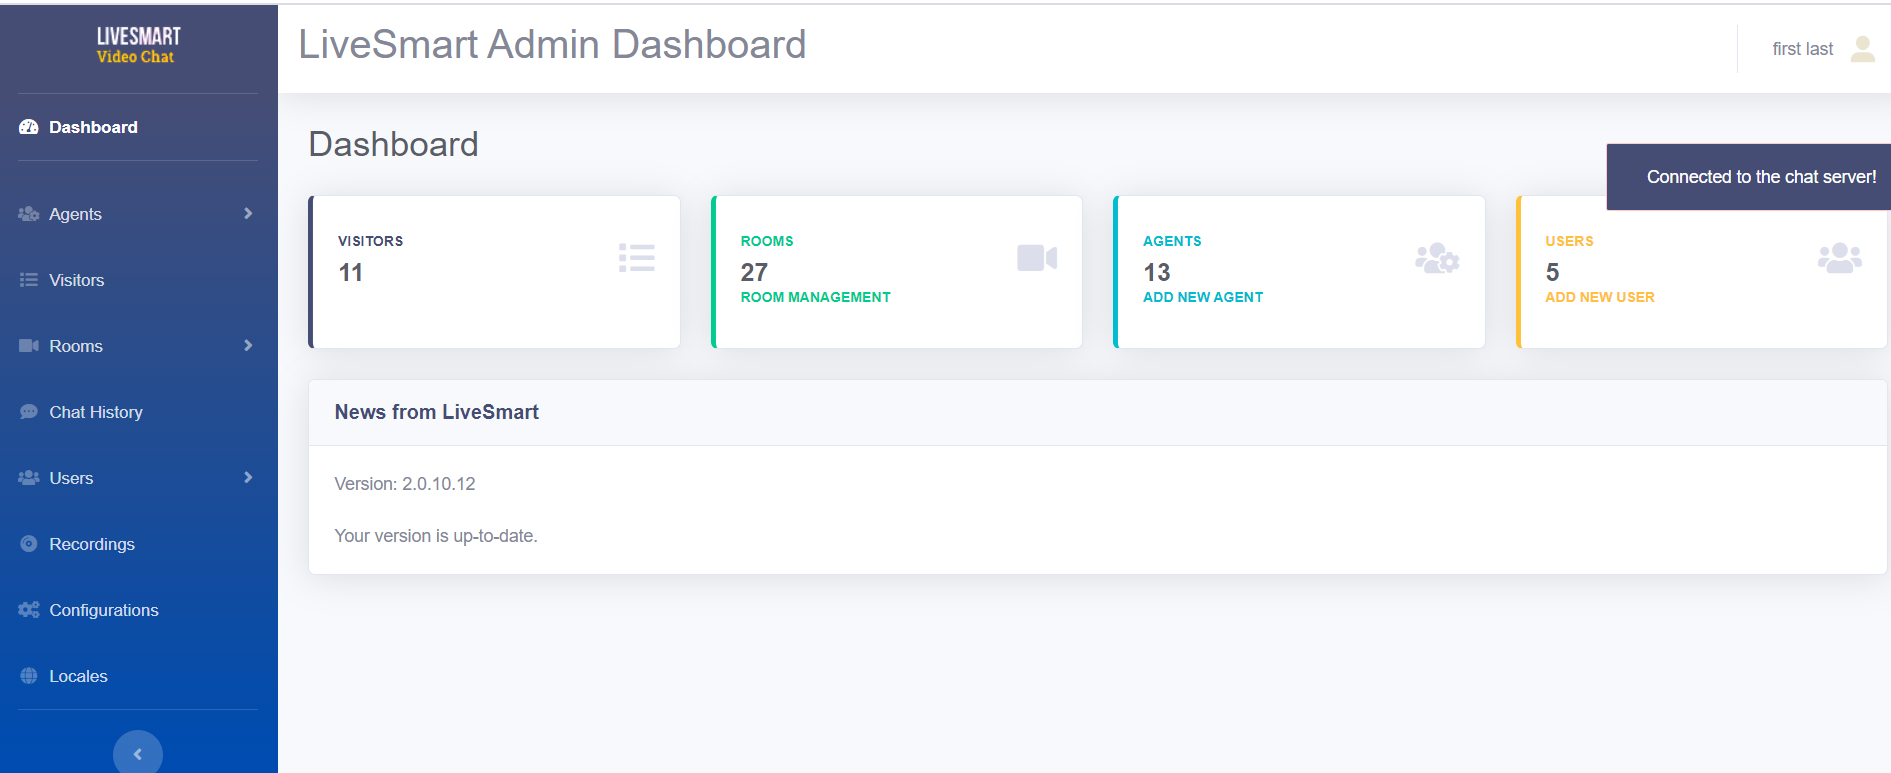
Admin panel
The admin panel has a backend information about the organizers, users, rooms, chat history and recordings.
You need PHP >5.6 and MySQL on your server.
Check here with demo/demo. The client page for the demo organizer is here.
Short URLs are a convenient way to represent your rooms and that can be easily shared and send. You need mod_rewrite enabled. If you have already .htaccess in the folder where LiveSmart is, check demo.htaccess and add the new lines to your .htaccess, otherwise use demo.htaccess and rename it to .htaccess